

0:35 AM Smart Thermostat Installation: Key Steps Before You Swap | |
Smart thermostats can cut energy waste, improve comfort with scheduling, and add remote control through a phone app. But installation success depends less on the thermostat “brand” and more on whether your home’s wiring and HVAC setup match the new device’s requirements.
Before you remove your old thermostat, spend a few minutes checking compatibility. Many installation problems—like no heat, no cooling, or constant error messages—stem from mismatched wiring connections or an HVAC system the thermostat can’t properly control. 1) Confirm your HVAC system is supportedStart by identifying what you have: central air with furnace, heat pump systems, boilers, or multi-stage heating/cooling. Smart thermostats often support specific configurations (for example, heat pumps with auxiliary/backup heat), and some models require particular settings to work correctly.
If you’re unsure, look up your current thermostat wiring labels (or take a clear photo before disconnecting anything). You can also check your furnace/air handler documentation for system type and stage count. 2) Check wiring compatibility and terminal labels
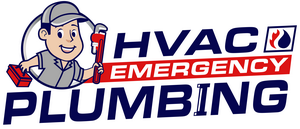
Most thermostats use low-voltage wiring, but smart models may need particular wires connected to specific terminals (commonly labeled R, C, W, Y, G, and O/B for heat pump reversing valves). Even if your old thermostat “worked,” you may not have a common (C) wire—a frequent reason for smart thermostats failing to power consistently.
Before replacement, verify which wires are present and where they currently connect. If you don’t see a C wire, the installation approach may involve using a bundled power solution, adding wiring, or selecting a thermostat that supports alternative power methods (depending on your model and compatibility). 3) Make sure you have power (and plan for a C-wire if needed)Smart thermostats typically need continuous power to keep Wi-Fi functions and sensors active. If you have a C wire already, you’re usually in good shape. If not, don’t guess—confirm whether your new thermostat supports power without a C wire and what “best practice” setup it recommends.
When adding a C wire or making any HVAC wiring changes, follow the manufacturer’s guidance closely. Incorrect wiring can damage equipment or create safety risks, especially if you’re dealing with older systems. 4) Match heat pump settings and fan control
Heat pumps are a common complication. The reversing valve wiring (often connected to terminals labeled O or B) must be set correctly, and auxiliary heat configuration may be required. Likewise, fan control settings (like whether the thermostat should run the fan during heating stages) can affect comfort and energy use.
During setup, the thermostat app usually walks you through system type selection. Choose the right options based on your HVAC configuration—then double-check that heating and cooling behave as expected.
After installation, test both modes: set a higher temperature to confirm heat turns on and set a lower temperature to confirm cooling (if available). Pay attention to whether the fan turns on appropriately and whether the system switches cleanly between stages.
If something doesn’t behave normally, check for common wiring mismatches first (especially R, G, W, Y, and O/B). Many thermostats also provide diagnostic screens or prompts in the app that can help pinpoint the issue.
For best results, plan to complete the setup in a stable spot near your Wi-Fi router. Poor signal can make pairing harder or cause delayed responses. Once connected, calibrate schedules, enable geofencing (if supported), and review any advanced settings like staging and minimum run times.
Next step: Take photos of your current wiring, verify your thermostat’s compatibility requirements (especially the C-wire and heat pump terminals), then follow the new thermostat’s installation guide exactly. If your system is complex—or if you discover you need to add wiring—consider hiring a licensed HVAC technician to avoid costly mistakes.
| |
⏰ Dispatcher support 24/7
📞 224-754-1984CALL ☎ Subscribe 👆 FORUM 🗣
North Shore, Northwest suburbs of Chicago, IL
Next & Previous posts
Related articles:
| Total comments: 0 | |